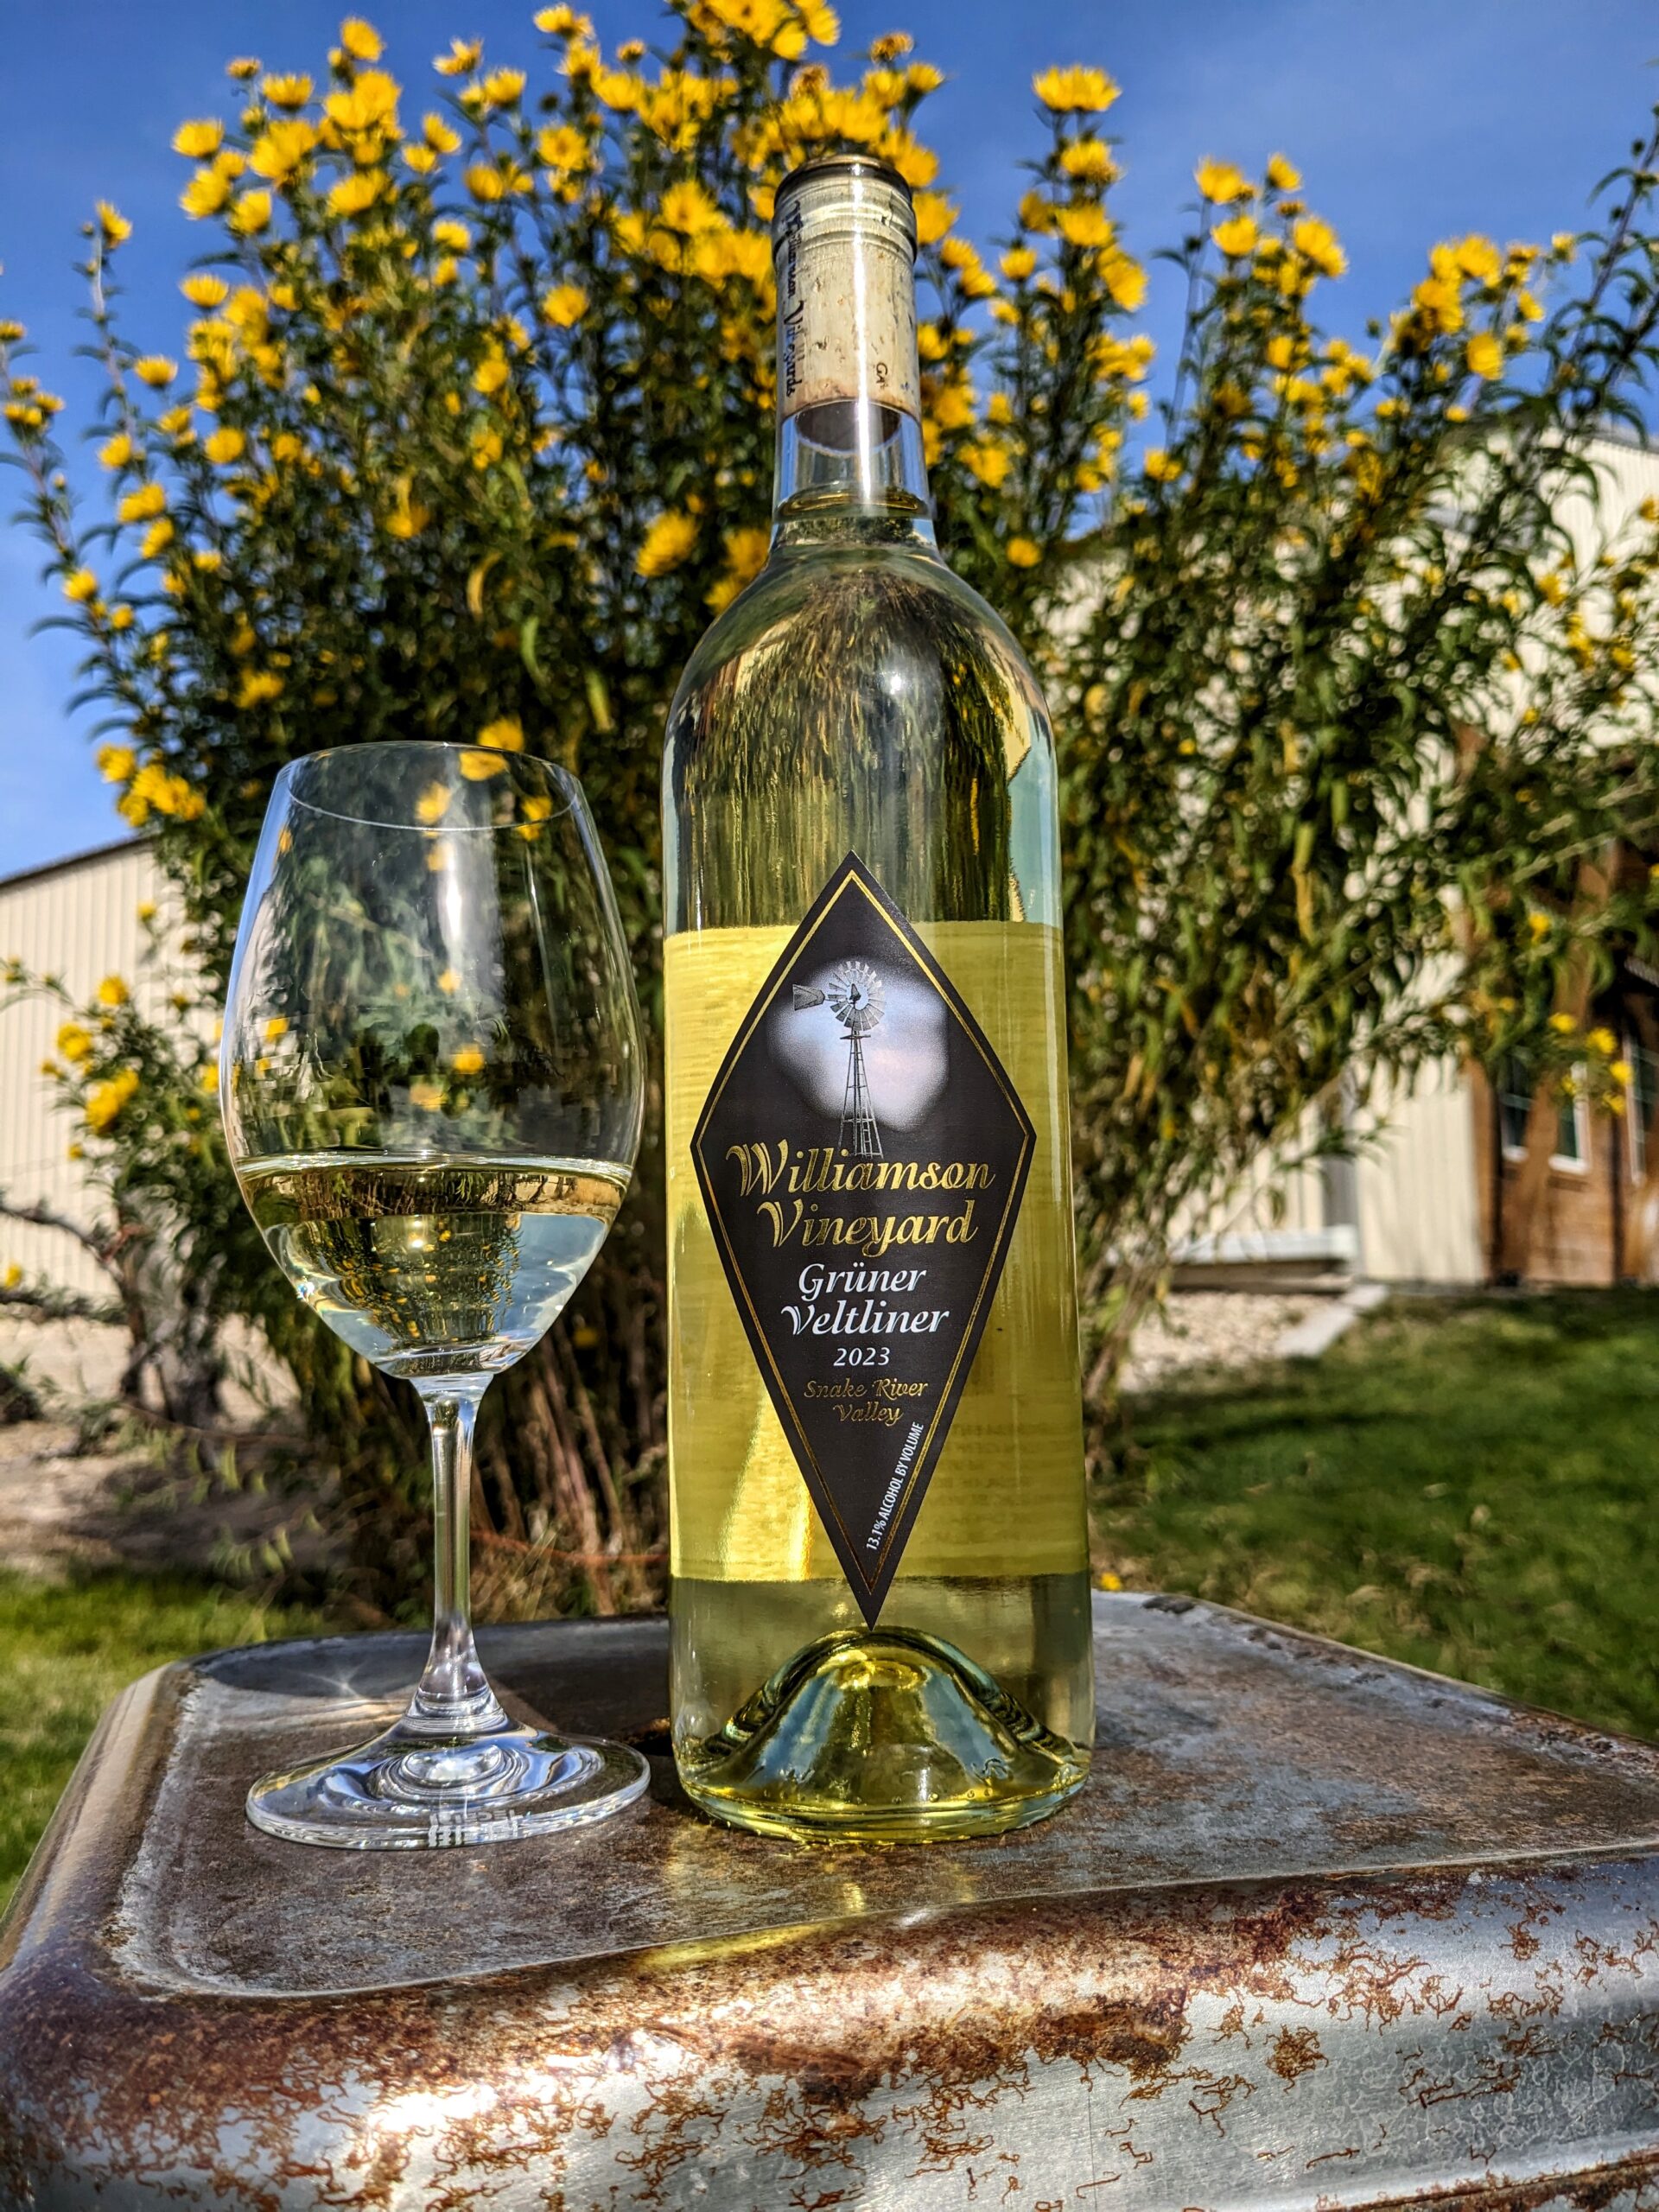
Lemon Butter Shrimp with Fresh Herbs

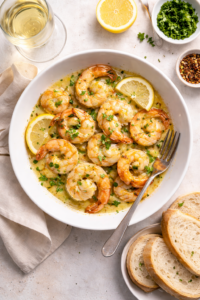
A bright, elegant pairing for Williamson’s 2022 Dry Riesling

This light and vibrant seafood dish was designed to complement the lively acidity and citrus notes found in our 2022 Dry Riesling. Tender shrimp are gently sautéed in lemon butter with garlic and fresh herbs, creating a dish that mirrors the wine’s bright flavors of green apple, lemon zest, and citrus while allowing its crisp finish to shine.
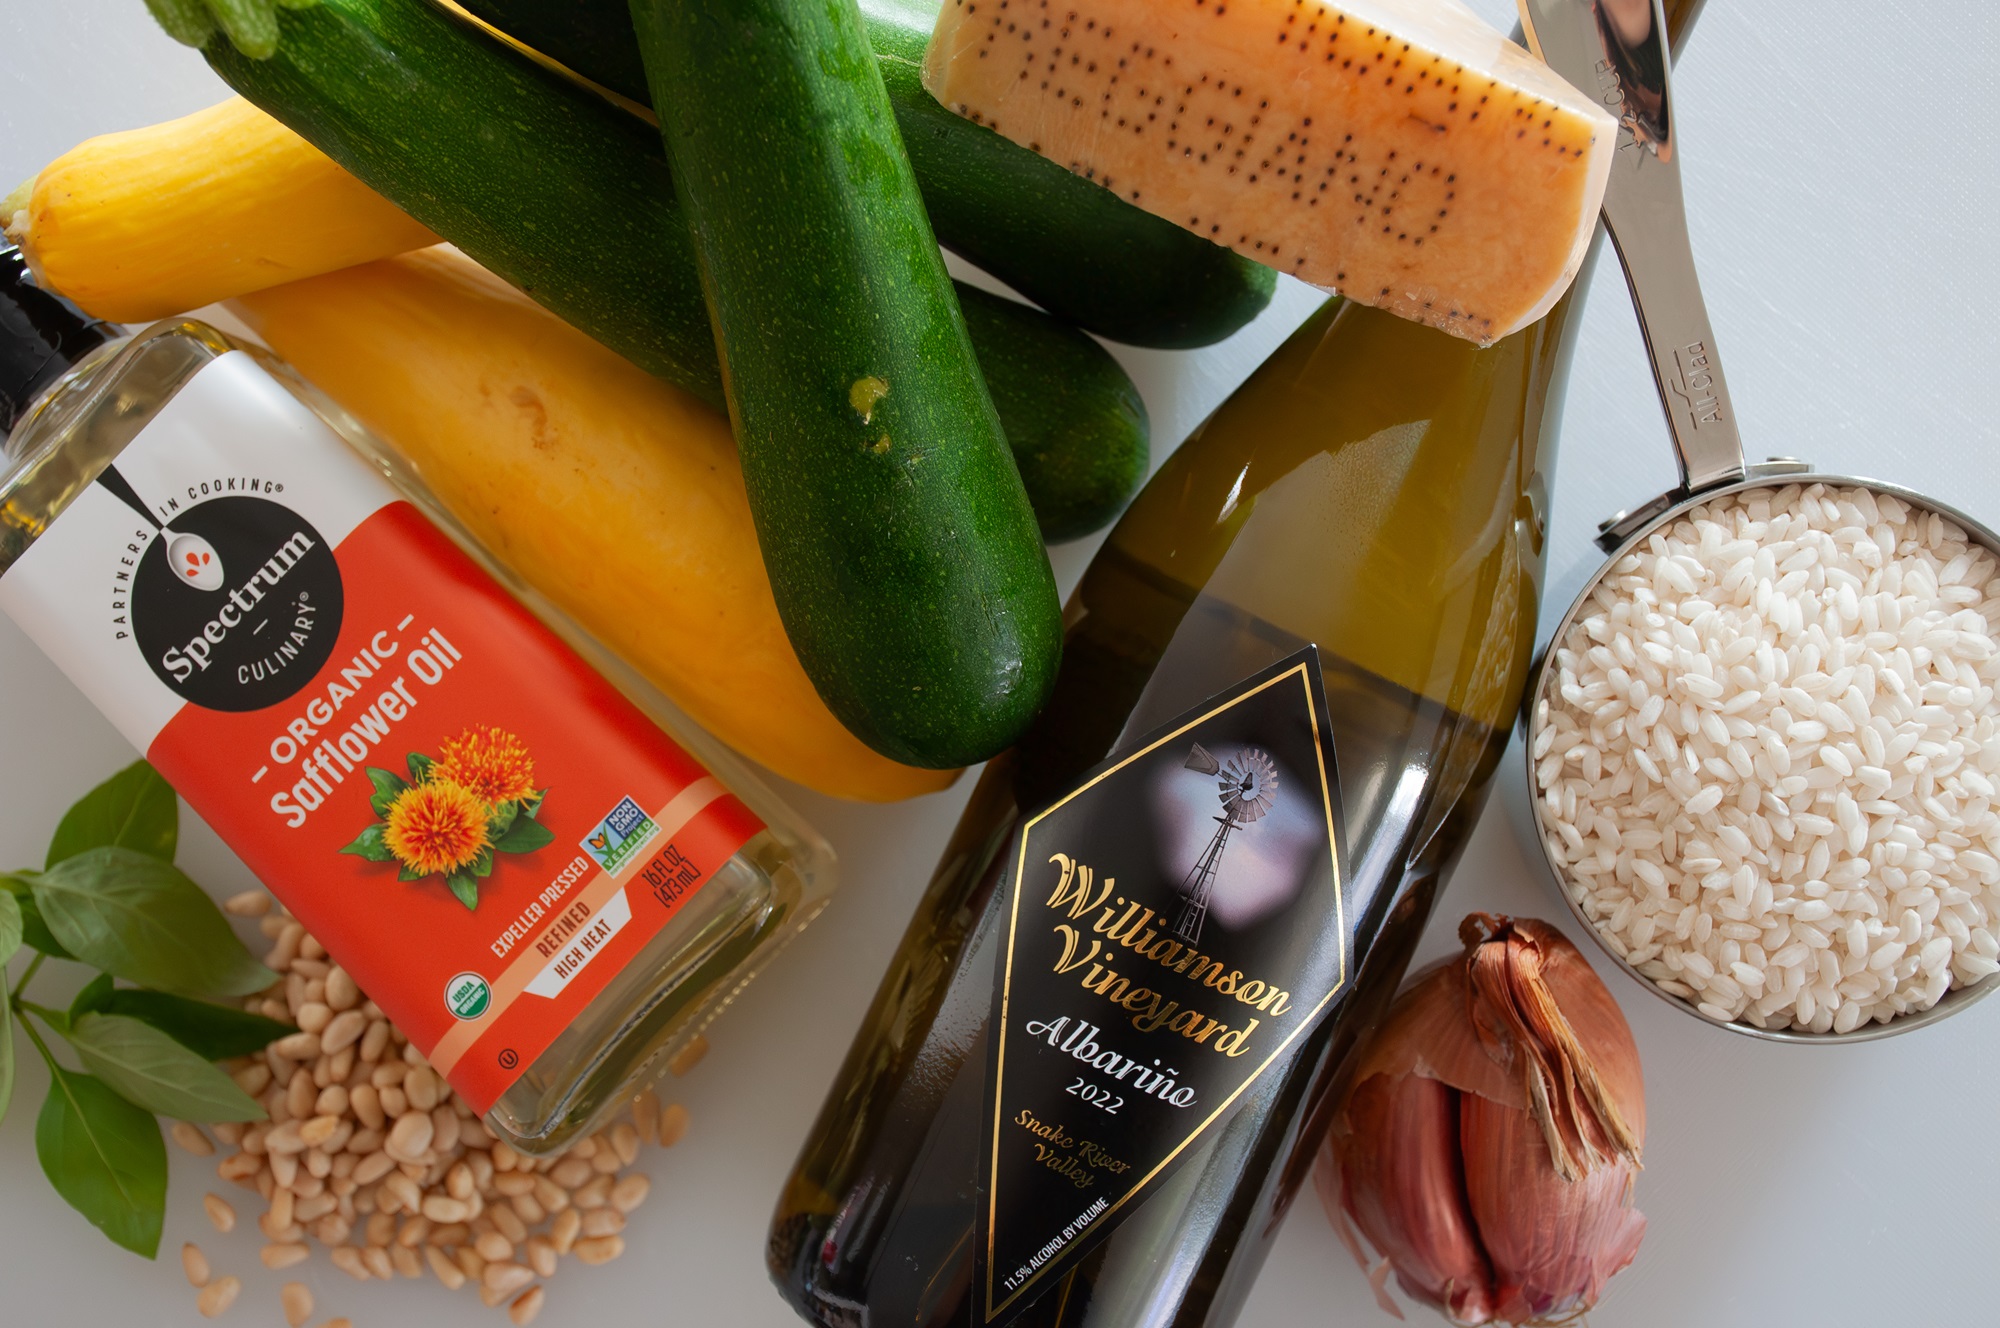
Ingredients

1 lb large shrimp, peeled and deveined

3 tablespoons butter

2 cloves garlic, minced

Zest of 1 lemon

Juice of ½ lemon

¼ cup 2022 Williamson Dry Riesling

1 tablespoon fresh parsley, chopped

1 teaspoon fresh thyme leaves

Salt and cracked black pepper, to taste

Lemon wedges for serving

Instructions

Pat shrimp dry and lightly season with salt and pepper.

In a large skillet over medium heat, melt the butter. Add the garlic and sauté until fragrant, about 30 seconds.

Add the shrimp in a single layer and cook for 1–2 minutes per side until pink and just cooked through.

Stir in the lemon zest, lemon juice, and white wine. Allow the sauce to simmer for about 1 minute until slightly reduced.

Remove from heat and finish with fresh parsley and thyme.

Serve immediately with lemon wedges.

Serving Suggestion

Serve alongside crusty bread, angel hair pasta, or a simple garden salad. The bright lemon butter sauce beautifully mirrors the citrus and crisp acidity of our 2022 Dry Riesling, making each sip and bite refresh the palate.


Cork to Fork is back and ready to serve up a hearty and delicious dish to warm up your bones and bellies during the cold winter season!

A slow-simmered winter sauce with tender beef, earthy mushrooms, and a whisper of dried fig warmth to liven up your pasta or sauteed vegetables.

Ingredients (Serves 4–6)

Ragù

  • 2 lbs beef chuck or beef shoulder, cut into small chunks

  • Kosher salt & freshly cracked black pepper

  • 2 tbsp olive oil

  • 1 large yellow onion, finely diced

  • 3 cloves garlic, minced

  • 12 oz cremini or baby bella mushrooms, finely chopped

  • 1 tbsp tomato paste

  • 1½ cups Windmill Red 🍷

  • 1 cup beef stock

  • 1 (28 oz) can crushed tomatoes

  • 1 tsp dried thyme

  • 1 bay leaf

  • Optional: ¼ tsp crushed red pepper flakes

  • Optional but lovely: 1–2 tsp finely chopped dried figs

To Finish

  • Fresh parsley or thyme

  • Freshly grated Parmesan or Pecorino

  • Cooked pappardelle, tagliatelle, or rigatoni – alternative option: roasted spaghetti squash or hearty sauteed vegetables

Instructions

1. Brown the Beef

Season beef generously with salt and pepper.
Heat olive oil in a large Dutch oven over medium-high heat. Brown beef in batches until deeply caramelized on all sides. Remove and set aside.

This browning is where the wine’s “dusty oak” note really comes alive.


2. Build the Base

Lower heat to medium. Add onion to the pot and cook until soft and golden, about 6–8 minutes. Stir in garlic and cook 30 seconds until fragrant.

Add mushrooms and cook until they release their moisture and begin to brown. Don’t rush this. This step deepens the ragù and mirrors the wine’s earthy mid-palate.


3. Tomato Paste & Deglaze

Stir in tomato paste and cook 1–2 minutes until brick red.
Pour in Windmill Red, scraping up all the browned bits. Let simmer 5 minutes to reduce slightly.


4. Slow Simmer

Return beef to the pot. Add crushed tomatoes, beef stock, thyme, bay leaf, and figs (if using). Stir to combine.

Bring to a gentle simmer, cover slightly ajar, and cook on low for 2½–3 hours, stirring occasionally, until beef is tender and the sauce is thick and silky.


5. Finish & Serve

Remove bay leaf. Taste and adjust seasoning.
Serve over wide pasta with grated cheese and a scattering of fresh herbs.


Serving & Pairing Notes

  • Best with pappardelle, wide noodles catch the sauce beautifully

  • Finish with olive oil drizzle or butter for extra silkiness

  • Pair with Windmill Red, OBVIOUSLY.

  • Enjoy!

Williamson Cork to Fork Presents:

Grilled Albariño Chicken with Charred Corn & Peach Salsa

🍗 For the Chicken + Marinade

  • 4 boneless, skinless chicken thighs or breasts
  • ½ cup Williamson Albariño
  • 3 tbsp olive oil
  • 2 tbsp honey
  • Zest + juice of 1 lemon
  • 3 garlic cloves, minced
  • 1 tsp smoked paprika
  • ½ tsp chili flakes (optional, for a kick)
  • Salt + pepper to taste

🥭 For the Corn & Peach Salsa

  • 2 ears of corn, husked
  • 2 ripe peaches, diced
  • ½ small red onion, finely chopped
  • 1 jalapeño, finely chopped (optional)
  • Juice of 1 lime
  • ¼ cup chopped fresh cilantro or basil
  • Drizzle of olive oil
  • Salt to taste


🔥 Instructions
1. Marinate the Chicken
In a bowl or zip-top bag, whisk together the Albariño, olive oil, honey, lemon zest + juice, garlic, paprika, chili flakes, salt, and pepper. Add the chicken and marinate for at least 1 hour, or up to 6 hours in the fridge.
2. Grill the Corn
Preheat your grill to medium-high. Grill the corn directly over the flame, turning occasionally, until lightly charred (about 8–10 minutes). Let it cool, then cut the kernels off the cob.
3. Make the Salsa
In a bowl, mix together the grilled corn, peaches, red onion, jalapeño, lime juice, olive oil, and herbs. Season with salt. Let it sit for 10–15 minutes for the flavors to meld.
4. Grill the Chicken
Grill the marinated chicken for about 5–7 minutes per side (depending on thickness) until nicely charred and fully cooked through. Let it rest for a few minutes before slicing.
5. Plate & Serve
Serve the sliced chicken over a bed of the charred corn and peach salsa. Garnish with extra herbs and maybe a squeeze of fresh lime. Pair with a chilled glass of Williamson Albariño for the full experience.

🔄 Optional Add-ons:
Serve with grilled sourdough, couscous, or a bed of arugula.

Add avocado to the salsa for creaminess.

Want a vegetarian version? Swap chicken for grilled halloumi or portobello mushrooms.


Welcome to July!

We’re in the midst of a beautiful summer here in Idaho, and while perhaps talks of HEAT aren’t what you’re daydreaming about while the temps rise – this recipe is sure to refresh the pallet in the best way. We’re pairing our delightfully sweet Nectar with some spicy chicken wings! Keep scrolling and take some notes: Cork to Fork: When Sweet Meets Heat is here!

Servings: 4-6
Prep Time: 15 mins
Cook Time: 45 mins
Total Time: ~1 hour

Ingredients

For the Wings:

  • 2.5–3 lbs chicken wings (split and tips removed)
  • 1 tbsp olive oil
  • 1 tsp kosher salt
  • 1 tsp smoked paprika
  • ½ tsp black pepper
  • ½ tsp garlic powder

For the Spicy Sweet Nectar Sauce:

  • 1 cup Williamson Nectar wine
  • ¼ cup honey
  • 2 tbsp brown sugar
  • 2 tbsp apple cider vinegar
  • 1 tbsp soy sauce
  • 2 tsp fresh lime juice
  • 1 tbsp finely grated fresh ginger
  • 2 cloves garlic, minced
  • 1–2 tsp red pepper flakes (adjust for heat)
  • 1–2 tsp sriracha or hot sauce (optional, for extra kick)
  • 1 tbsp cornstarch + 2 tbsp cold water (slurry)

Garnish (optional but encouraged):

  • Fresh cilantro or parsley, chopped
  • Thinly sliced red chili
  • Lime wedges
  • Toasted sesame seeds


Instructions
1. Prep and Roast the Wings
Preheat oven to 425°F (220°C).

Pat chicken wings dry with paper towels (this helps them crisp).

In a large bowl, toss wings with olive oil, salt, pepper, smoked paprika, and garlic powder.

Arrange wings in a single layer on a parchment-lined baking sheet or on a wire rack over a baking tray.

Bake for 40–45 minutes, flipping halfway through, until golden, crispy, and cooked through.

2. Make the Sweet & Spicy Nectar Sauce
While wings bake, combine Nectar wine, honey, brown sugar, apple cider vinegar, soy sauce, lime juice, ginger, garlic, red pepper flakes, and sriracha (if using) in a small saucepan over medium heat.

Bring to a simmer, stirring occasionally. Let reduce by about ⅓ (this takes ~10–12 minutes).

Mix cornstarch and cold water into a slurry, then whisk into the sauce.

Continue cooking until the sauce thickens to a glossy glaze, about 2–3 minutes.

Taste and adjust: add more lime for acidity, more heat, or more honey depending on your preference.

3. Toss and Serve
Once wings are done, transfer them to a large bowl.

Pour the warm Nectar sauce over the wings and toss to coat evenly.

Plate and garnish with fresh herbs, red chili slices, lime wedges, or sesame seeds.

Serving Tip
Pair with chilled glasses of Nectar, a tangy slaw, or grilled peaches for a full “sweet meets heat” spread!


May’s Featured Wine of the Month
We’re featuring a different wine each month during which you can purchase the special wine at a premium price!

This month is…

The delightful 2023 Grüner Veltliner!

This beautifully clear pale yellow wine sports tropical fruit and crisp apple aromas that are rounded off with mild minerality and hints of thyme or clover. The zesty flavors of tangy citrus and starfruit start on your palate then segue to flavors of peach, lemon, and sweet apple on the finish.


Food Pairings: The zesty acid in this wine makes it a wonderful pairing with fatty dishes. Fried chicken, smoked ham, herbed & buttered young potatoes, even ramen or pho. We think this wine would also be great with shellfish, a cold summer noodle salad, and soft cheeses like appenzeller, chevre & feta. Herbs that would go well are tarragon, parsley, thyme, dill, and mint.


This week’s Cork to Fork is starting off August right as we cheers to our featured Wine of the Month with Albariño! (In case you haven’t heard, it’s also 10% off right now – so – do yourself a favor and grab a couple bottles at the tasting room).
Risotto alla Nerano

close up of risotto in casserole dish garnished with leafy greens

The star of this risotto is zucchini. A summer vegetable with basically no flavor at all, delicate in texture, but lots of potential. It’s highlighted in a unique way by frying, cooling, then incorporating into a velvety risotto with shallot, garlic, parmesan, and basil. When you take your first bite it is heaven. Let’s begin!
bottle of albarino laying on a kitchen counter with a selection of zucchini, shallot, parmesan cheese,rice and cooking oilGrab either a cast iron pan, a Dutch oven, or a deep fryer and fill it with Sunflower or Safflower oil. It has a high smoke point and completely neutral flavor. I used a cast iron pan with high side walls and put about two inches worth of oil in the pan. I turned the heat on medium/low and let time do its thing.

With either a mandolin or the knife skills of Gordon Ramsey, slice your zucchini into thin rounds. If it seems like you have a mountain of zucchini and that you couldn’t possibly consume all that’s before you – zip that lip. It’s going to basically disappear. I used 5 zucchinis and once the frying was complete I was left with about a cup and three-quarters of fried zucchini goodness. You want a nice golden color on them, too, and that medium to low temp on your stove should be able to produce that just fine with a little patience.

thin coins of zucchini frying in a cast iron pan with an inch of oil

Here’s a plot twist for this recipe: put it in a bowl, cover with plastic wrap, and stick it in your fridge overnight. Or at least 8 hours. You want to fry these and then let them soften. It’s all a part of the process.
If you’ve made risotto before, the remainder of this recipe will all be very intuitive. If you’ve never made risotto before, I promise you it’s nowhere near as complicated as you might assume – it simply takes patience.
Take olive oil and heat it in a skillet over medium low. Finely chop your shallot and mince your garlic. Slide them into the hot oil and let them become translucent and fragrant before adding in your arborio rice. For a few minutes, let those flavors marry. Then, grab your Williamson Albariño and pour in about a cup and a half to deglaze the pan. Aggressively stir with a wooden spoon and get any stuck on bits from the bottom loosened up and let them join the party. Now you’re beginning the next phase of this recipe.wine is being poured into a dutch oven containing rice, shallot, and garlic*tip* Arborio rice is a variety of rice rich in starch, which is what causes this dish to be creamy. A real risotto will never have cream added to it. Its creaminess is provoked from each grain as you stir and incorporate more liquid as time goes on.
Once the liquid is 90% depleted (and your rice is beginning to look plumper and creamier) add in another cup to cup and a half of stock. You can use chicken or vegetable – whatever you prefer. Stir, stir, stir. This is where you’ll be for the next 30 minutes: in front of your stove stirring.
As the liquid depletes – replenish. I repeated this step 6 times before my risotto was tender with the slightest of slight toothsomeness. You don’t want the rice to stick in your teeth, and you also don’t want it to be complete mush. Use judgement and taste test along the way.
Right when it appears you’re about 85% of the way done with your stock replenishment journey, add in the refrigerated zucchini. Plop it in, add maybe your last or second to last round of stock, and start stirring (again, sorry, I know) but, this is it! “Alexa, play that song about a final countdown or something”.
fried zucchini on top of risotto before stiring

*tip number two* Don’t salt your risotto. I understand the desire to have a well-seasoned dish – trust me. But the final step is adding parmesan, a very salty cheese, and if you salt your dish and then add a highly salty component, you may discover a disappointment.
Once you’re confident you’ve got a well-cooked risotto preferable to your taste, add in parmesan cheese. I tend to lean toward the “good stuff” for occasions like this, and freshly grated some Parmigiano Reggiano. Add it in, stir (SORRY about the stirring), and taste for salt. I ended up adding a couple pinches of sea salt at the end to make it perfect.
Garnish with additional zucchini (I saved a few delectable pieces), basil, and an additional sprinkling of parmesan. Serve on your favorite plate with a glass of Williamson Albariño, sit back, and enjoy every second of your efforts.
It’s safe to say this meal takes some time. It’s also safe to say it’s worthy of it. We hope you enjoy this week’s Williamson Cork to Fork and the kick off to what will be a fabulous month of recipes highlighting our beloved Albariño.
Cheers!

INGREDIENTS
5 medium (7-8 inch) zucchini
1 ½ cups arborio rice
1 ½ cups Williamson Albariño
32oz Sunflower or Safflower oil
1 ½ quarts of stock, vegetable or chicken
2 shallots
3 gloves garlic
3 TBS olive oil
½ cup grated Parmigiano Reggiano plus extra for garnish
Basil for garnish
Salt to taste


Our final goodbye to our July Wine of the Month, Blossom Rosé, and a hat-tip to the delicious apricots grown in our orchard for being the star of the show.
                              Pan Roasted Apricots with Brie and Blackberries

fresh whole apricots with blackberries, fresh basil and a slice of brie gathered together on flat service
Talk about an easy and refreshing way to end your day – or hey, start it. Maybe even have it for lunch. Everything is made up and the points don’t matter – do what makes you happy with this one, folks.

As your (preferably) cast iron pan is heating up on the stove over medium heat, turn on your oven’s broiler on high and let it warm up. This comes together fast, by the way, and I love working with cast iron, but any oven durable pan will be fine.
Halve your apricots and remove the pit, set those aside and grab your brie. Cut the brie into slices about ¼ inch thick and then make squares that nestle into the center of the apricots where the pit once was. If you want them cheesier, make the cheese thicker, this is your life – live it. Set the cheese aside. Wash your blackberries, set those aside, grab your basil leaves and make a nice chiffonade. (Roll the basil leaves up and take a knife and cut it into thin strips. It’s basically basil confetti and when life includes basil confetti, life cannot be bad).
wine bottle of rose wine plus fresh blackberries, basil,  brie, and apricots

Now that you’ve got all your ingredients prepped and ready and your pan is hot (not at a smoking point though, don’t want that, you just want a nice sear/sizzle temp) you’re going to take your butter and let that melt, then evenly distribute your sugar and place the apricots flat side down into the butter and sugar. This is going to start the delectable caramelization that will make this dish sing.
halved apricots face down in skillet with butter

After a few minutes of letting the apricots caramelize, grab that lovely Blossom Rosé and deglaze the pan with about ¼ cup of the wine. Once that’s nearly evaporated and you’re left with a glossy syrup drenching the apricots, remove the pan from the heat and take either a spatula or tongs and flip the apricots cut side up.
Here’s the last minute assembly: place the squares of brie down first, then a blackberry. That’s it. Slid it under your broiler and watch carefully. You do NOT want to walk away from this. Depending on how your broiler behaves this could take 10 seconds or 75 seconds, but you want that cheese to get a few bubbles and brown spots and then you’re done. *note, the blackberries may change color, but they’ll still taste incredible!
apricots face up in cast iron skillet with brie and blackberries in the hollow of each, garnished with slivered basil

Sprinkle with your basil and serve by itself or, if you love yourself – with ice cream! This dish is the perfect mix of sweet and savory and is a delicious nod to summer flavors. We hope you enjoy!

INGREDIENTS

4 apricots, halved
3 TBSP butter
1TBSP sugar
1/4 cup Blossom Rosé
1.5 – 2oz of brie cheese, cut into squares
8 blackberries
Basil for garnish


This edition of Williamson Cork to Fork still features our lovely Wine of the Month – Blossom Rosé, but also another ingredient we’re rather fond of – cherries! It’s a sweet treat we’re sure you’ll enjoy AND it requires about the same amount of time to prepare as it does to brew a pot of coffee. Let’s dig in!

Cherry Clafoutis with Blossom Rosé wine sauce
Cast iron skillet filled with cooked cherries and batter
First things first, preheat your oven to 350°f degrees. Generously butter or grease (we chose the latter) a 8-9 inch pie dish or cast iron skillet (there we go again, we chose the latter), and place the cherries into the bottom of the prepared dish. It may seem like too many cherries, but you want a lot of them. I mean, steal one and eat it if you must, but don’t get worried that you have too many stuffed in there. Set aside and make the batter.
ingredients pre-set: cherries, eggs, sugar, cream, flour, more
Grab a large mixing bowl and whisk together the milk, sugar, eggs, vanilla, flour, and salt until smooth. It won’t take long at all – two minutes of your life, tops. Pour batter carefully over the cherries in the skillet or pie pan.
skillet filled with cherries and batter being poured over the top
Bake for one hour, or until the top is golden brown and a knife plunged to the center comes out clean. The clafoutis will be a bit puffed up, and as it cools it will deflate a bit – totally normal.
Here’s where our wine comes in! In a small sauce pan you’re going to make a simple syrup with 1/3 cup Blossom Rosé and 2 TBSP sugar. Whisk until dissolved and heat on high until it reduces by half. While it’s still hot, pour it onto the cooling clafoutis.

Once you’re ready to serve, dust lightly with powdered sugar and enjoy. The clafoutis has a rich, custard-like texture that’s perfectly complimented by the sweetness of the cherries. You could serve this for brunch just as easily as you could for dessert, and then you could get up the next day and have it for breakfast – there are no rules, just vibes.
Cast iron skillet with cooked cherries and batter dusted with powdered sugar

We hope you enjoy this wine-infused twist on a French classic brought to life by our delicious Blossom Rosé and cherries from our orchard. If you make it, let us know how it goes!

INGREDIENTS
1 TBSP butter or shortening
1 ¼ cup whole milk
2/3 cup granulated sugar
3 large eggs
1 TBSP vanilla extract
½ TSP kosher salt
½ cup all-purpose flour
3 cups cherries, pitted or unpitted
Powdered sugar, dusted for serving
SAUCE
1/3 cup Blossom Rosé
2 TBSP granulated sugar

Pro Tip: Make sure  you inform your guests whether or not they need to be on the look out for cherry pits!


This weekly series will highlight our chosen Wine of the Month (if you missed it, July is our 2022 Blossom Rosé) in various and delicious – if we do say so ourselves – recipes! No frills, no life-long backstory before you get to the actual recipe itself, just great wine, good ingredients, and scrumptious food. Let’s begin!

Copper River Salmon with Blossom Rose Cream Sauce & Asparagus

Cooking salmon doesn’t have to be complicated and this recipe proves just that. Begin by laying out a bed of sliced lemons on a sheet pan covered in foil. Place the salmon on top of the lemons. Voila – flavor. Speckle the top of the filet with lemons, dill, salt & pepper, and pour a quarter cup of Blossom Rosé on the salmon and ope – looky there. More flavor! You want the flavor of the fish to really shine here. Set your broiler on high, move the rack to the middle of your oven, you don’t want the fish to burn, and let it go for 6-10 minutes depending on how you like your salmon cooked. These filets were about an inch thick and we like ours medium well, so we did 8 minutes.
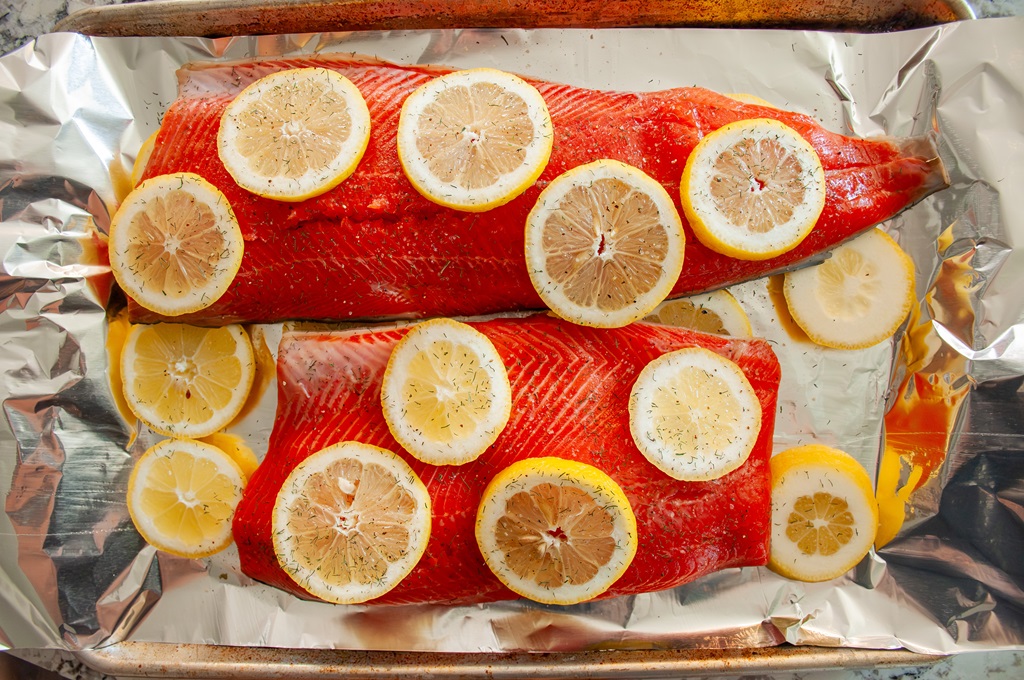
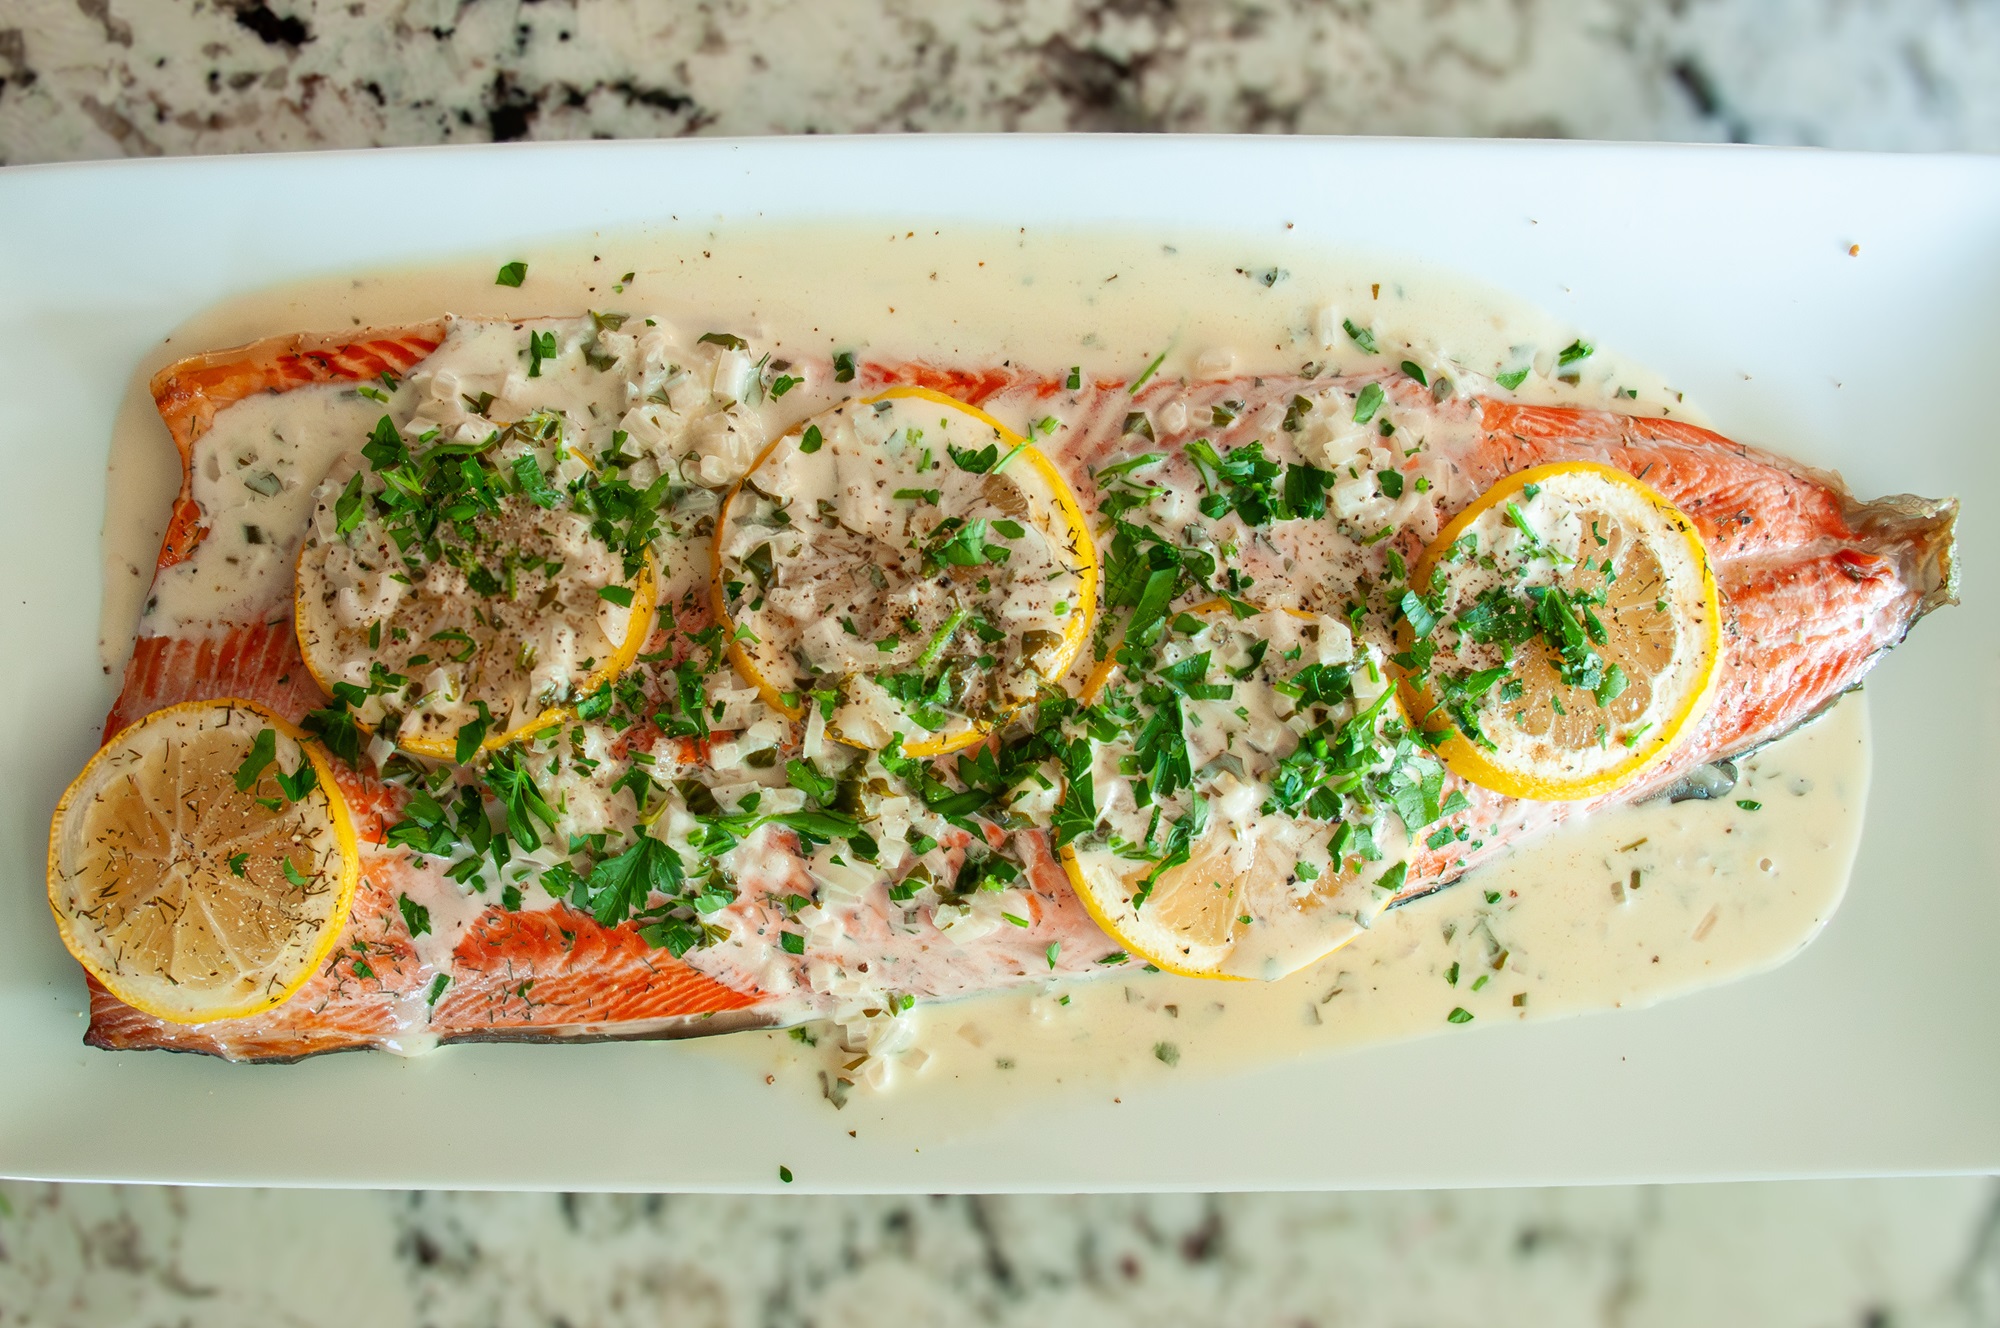
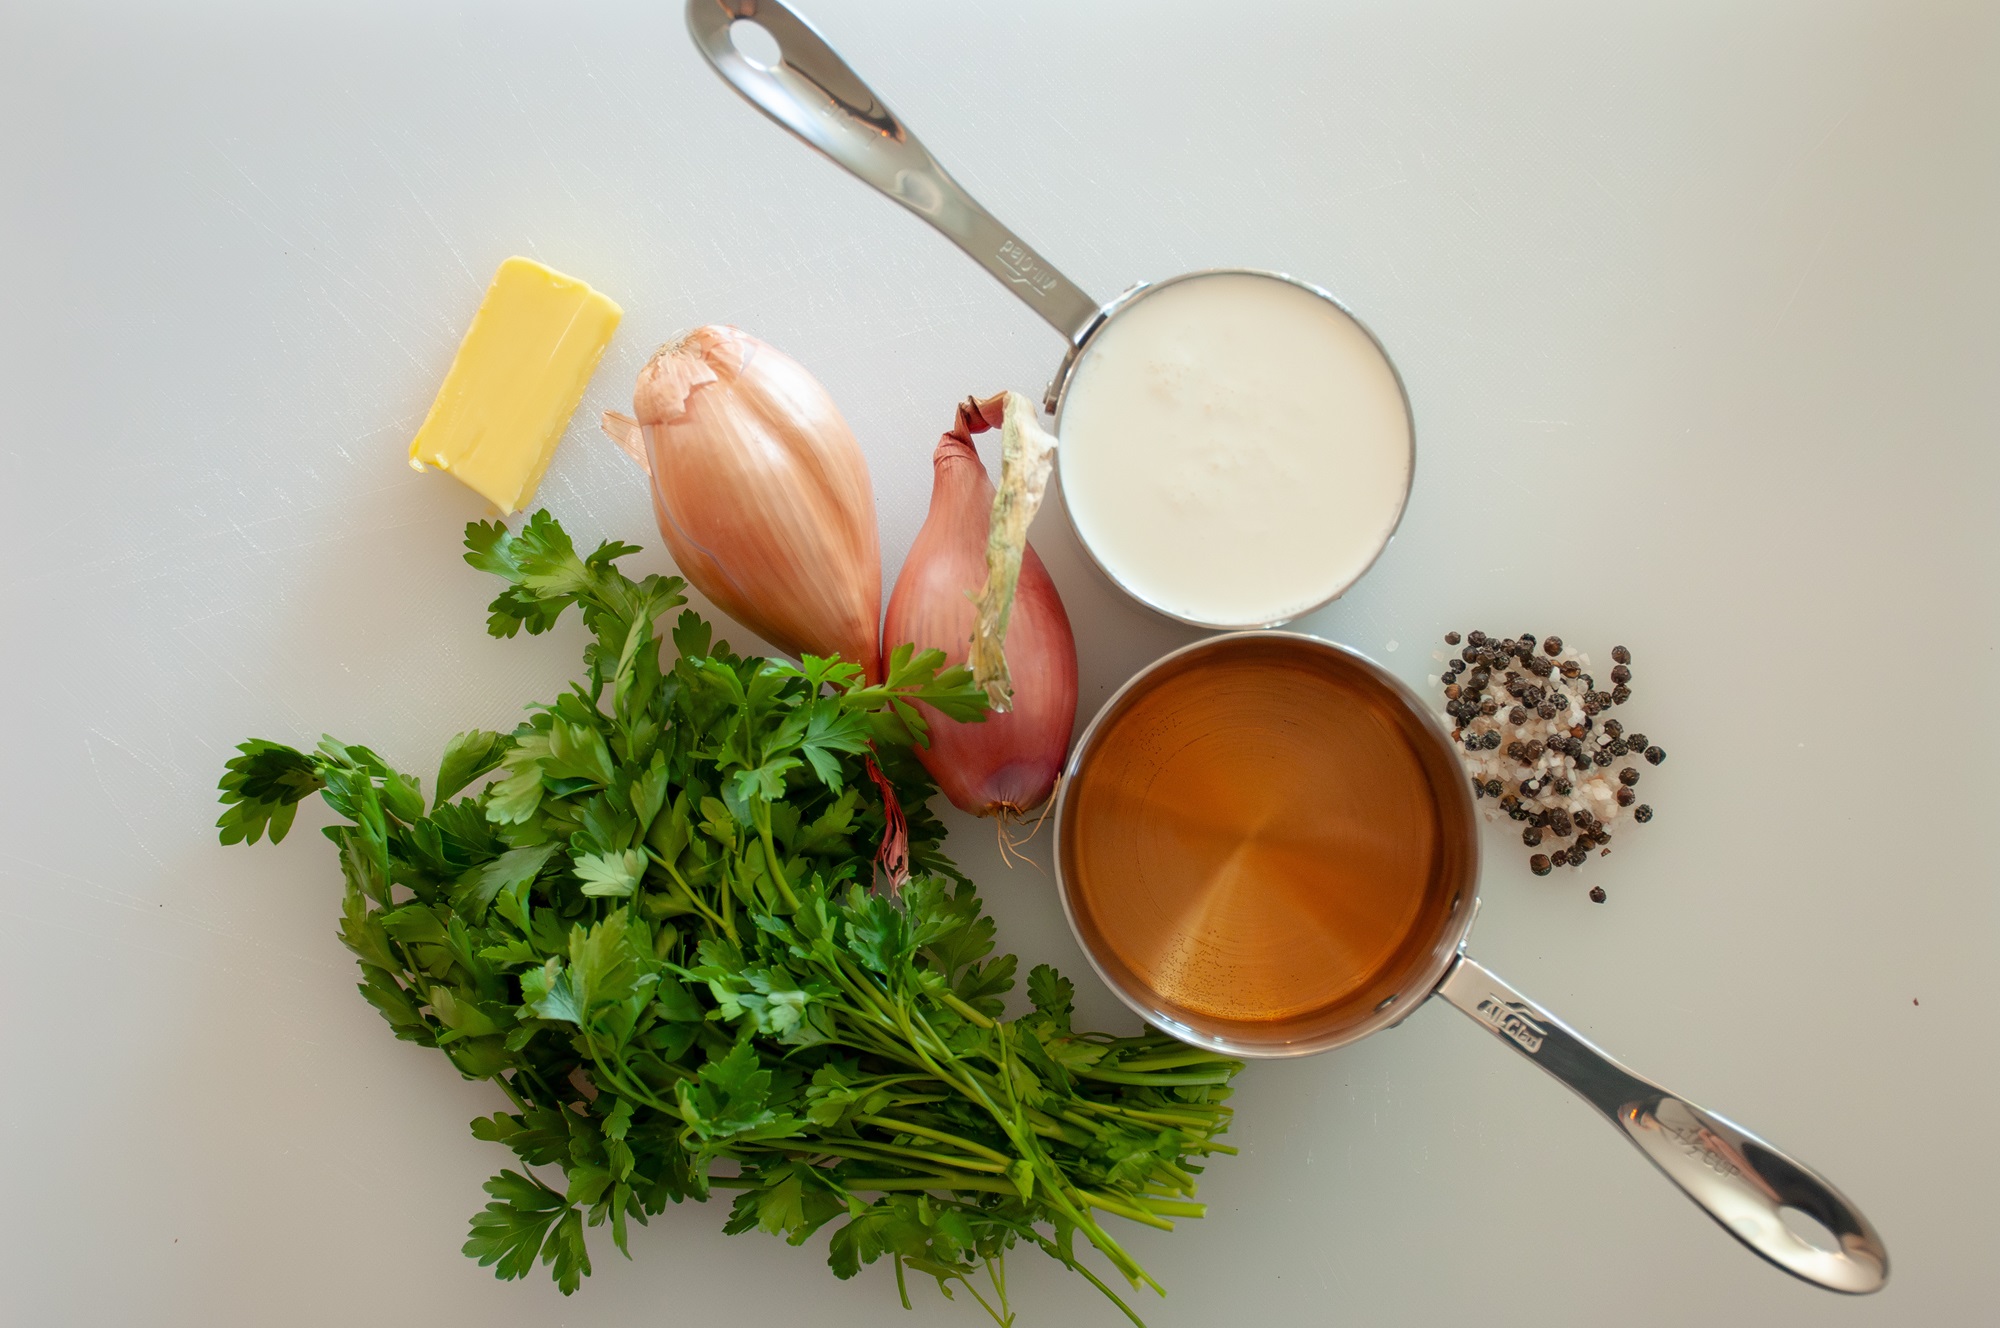
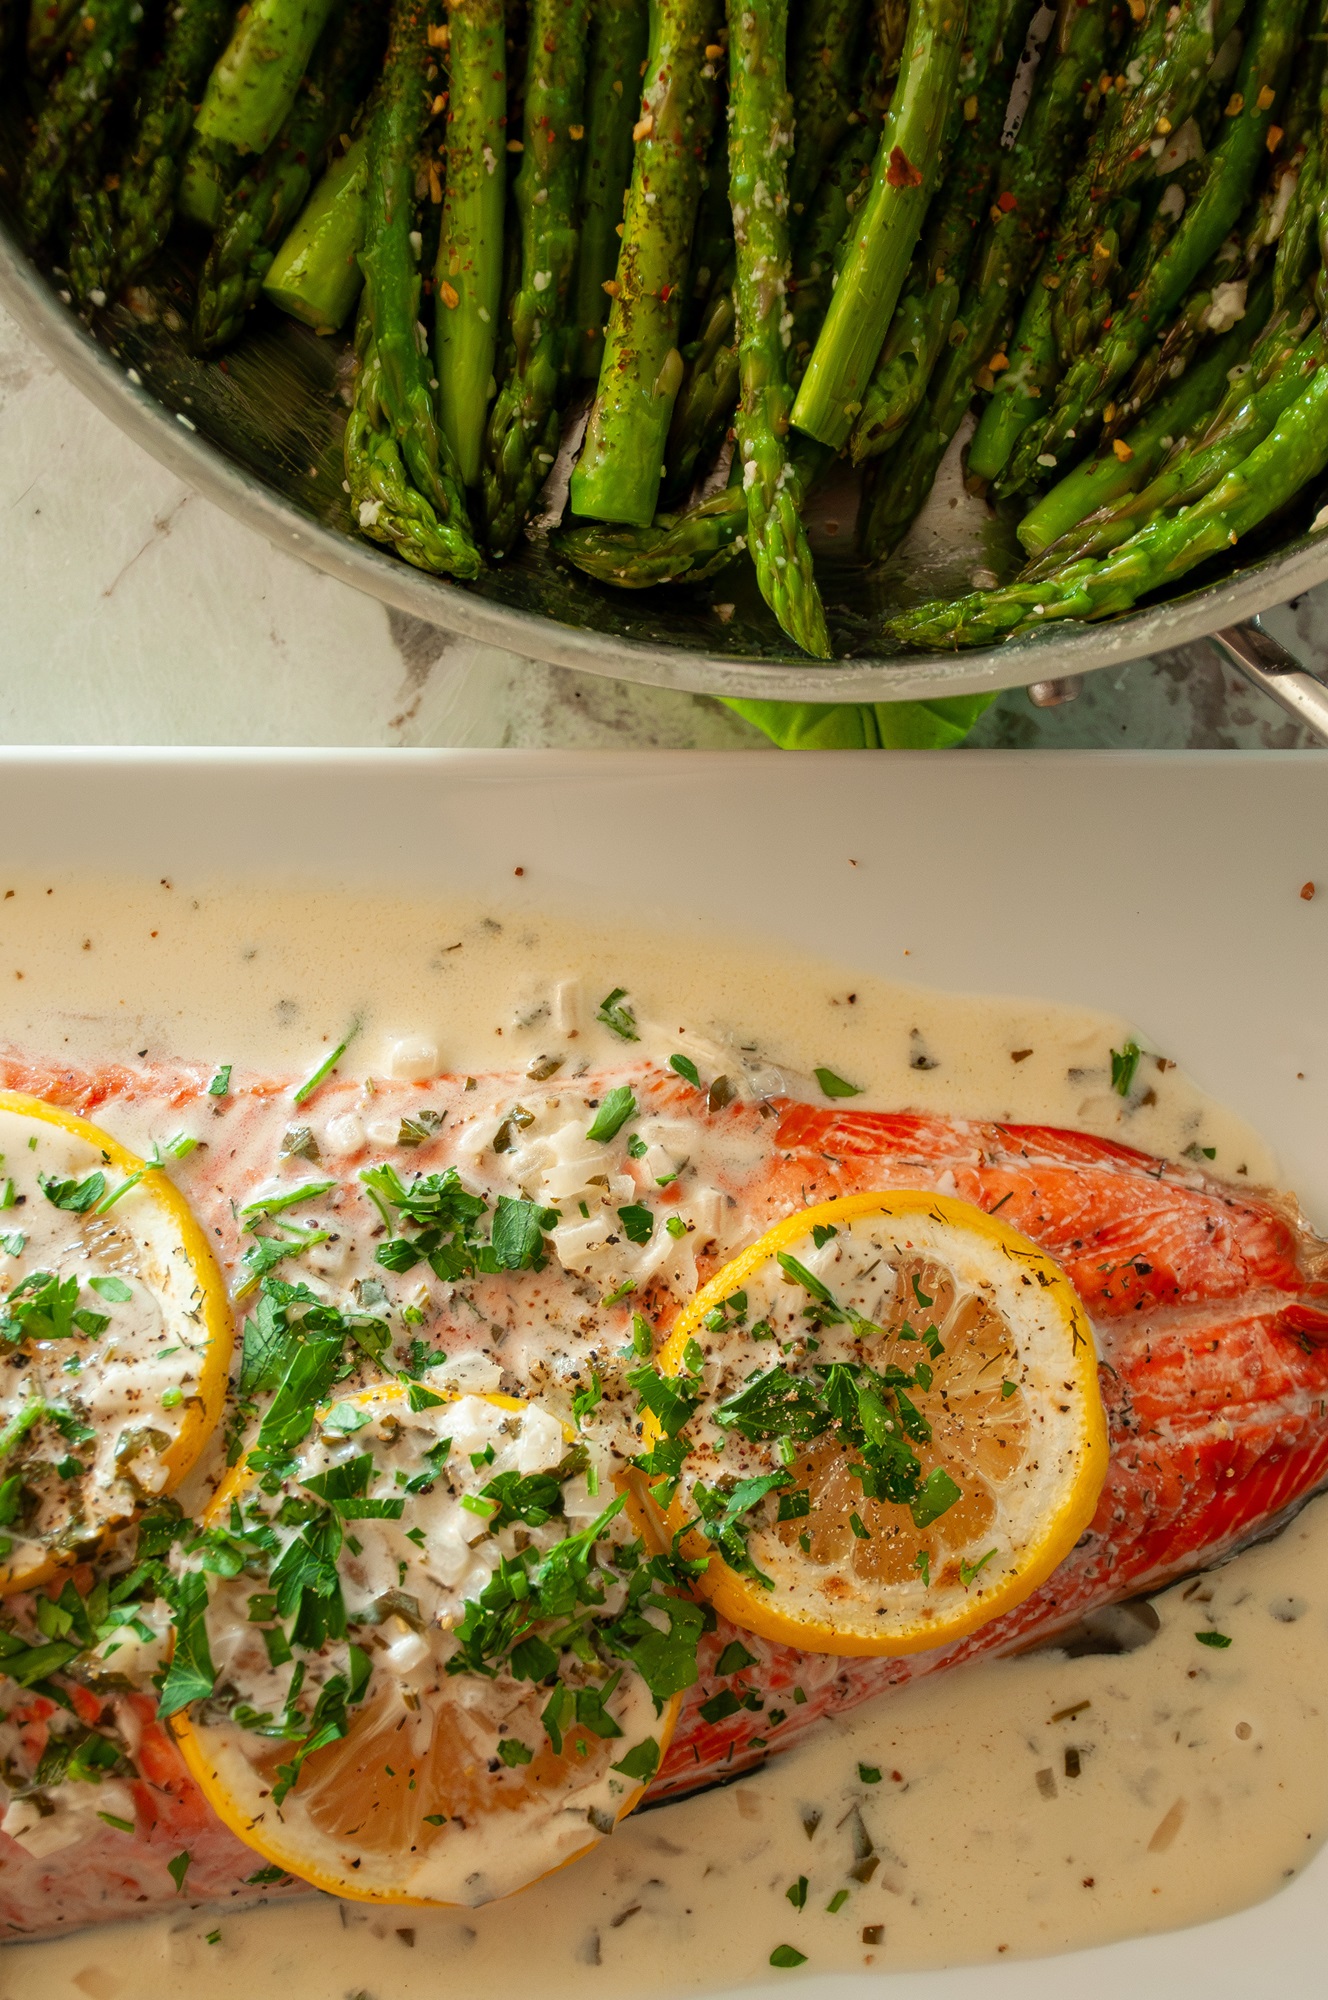
While the salmon is cooking – we get to start on our Blossom Rosé cream sauce. Melt butter in a sauce pan, add your finely chopped shallots and sauté until fragrant and translucent. Add in the wine, bring up to the rolling boil and reduce by half. This will take a few minutes. Once your sauce has reduced, lower the heat to medium and add in the cream. Season with salt and pepper and let it simmer. We let ours simmer for approximately 5 minutes. It got thick enough to coat the back of a spoon but not glorpy – yes, I said glorpy, we make up our own cooking terms now. Once the sauce is the consistency you prefer, cut the heat and add in chopped parsley (save some for presentation at the end). Just like that, your sauce is done.Simultaneously, while the sauce was cooking, we whipped up some asparagus in a pan with some butter, olive oil and some seasoning that has a little kick to it. Asparagus just fits so nicely with salmon, but if you want broccoli or zucchini, go for it. If you want bacon with it – literally no one will stop you.

The salmon rested for a few minutes while the sauce and asparagus finished. Transfer to a serving platter, pour the sauce over the salmon, and sprinkle with remaining parsley. This dish not only ends up being a crowd pleaser in taste – but absolutely gorgeous to behold. The unparalleled richness of the Copper River salmon matches perfectly with the delicate Blossom Rosé cream sauce. With minimal ingredients and about 40 minutes of your time, you’ve got a great dinner for your family or a crowd.With that, the first of many of our new Williamson’s Cork to Fork series concludes! Can’t wait to share what we’ve got in store next. Save the post and let us know what you think once you cook it up!
Cheers!


We learned something interesting when we were researching this recipe. Shepherd’s Pie is made with lamb. If you use beef then it’s Cottage Pie. Who knew? What we do know is that it’s a deliciously comforting meal that makes it easy to feed a crowd. Serve it with a fresh green salad and if you’re feeling adventurous, make an Irish soda bread and you’ve got an epic meal. If you’re making Shepherd Pie, pair with our Syrah, Malbec, or Harvest Moon Red. If you’re going for a Cottage Pie, then pair with Cabernet, Windmill Red, or Sangiovese. Cheers!

picture showing a skillet with mashed potatoes on top with a scoop out showing ground meat and carrots and peas

Shepherd’s Pie

Filling
•    1 teaspoon extra-virgin olive oil
•    1 ½ pounds ground lamb
•    Kosher salt and freshly ground pepper
•    1 medium onion, chopped (2 cups)
•    4 carrots, peeled and cut into ¼-inch coins (1 ¼ cups)
•    3 tablespoons tomato paste
•    1 tablespoon unbleached all-purpose flour
•    1 tablespoon Worcestershire sauce
•    1 ¼ cups low-sodium chicken broth
•    ½ cup dry red wine
•    1 cup frozen peas
•    ¼ teaspoon paprika
•    ¾ cup packed chopped flat-leaf parsley

Mash
•    2 ½ pounds Yukon Gold potatoes, peeled and cut into 1 ½-inch pieces
•    Kosher salt and freshly ground pepper
•    1 tablespoon extra-virgin olive oil
•    1 pound Savoy cabbage, thinly sliced (5 cups)
•    1 leek or bunch green onions, sliced
•    1 clove garlic, minced
•    ⅔ cup whole milk, warmed
•    4 tablespoons unsalted butter, melted, plus more for brushing

Filling: Preheat oven to 375 degrees. Heat a large skillet over medium-high. Swirl in oil. Add lamb; season with 1 teaspoon salt and cook, breaking up into bite-size pieces and stirring occasionally, until browned in places and just cooked through, 7 to 9 minutes. Transfer to a bowl.

Remove all but 1 tablespoon fat from skillet; return to medium heat. Add onion and carrots; season with 1 teaspoon salt. Cook, stirring occasionally, until vegetables are softened and golden in places, 6 to 8 minutes. Stir in tomato paste; cook 30 seconds. Stir in flour; cook 1 minute. Return lamb and accumulated juices to skillet. Stir in Worcestershire, broth, and 1/4 teaspoon pepper and paprika. Bring to a boil, scraping up browned bits from bottom of skillet. Reduce heat to medium-low; simmer until thickened slightly, 1 to 2 minutes. Remove from heat. Stir in peas and parsley. Transfer to a 2-quart baking dish.

Mash: In a large pot, cover potatoes with 1 inch of water; add 1 tablespoon salt. Bring to a boil, then reduce heat to medium and simmer until tender, 12 to 15 minutes; drain. Return pot to medium heat; swirl in oil. Add cabbage, leek (or green onion), garlic clove and 1/2 teaspoon salt. Cook, stirring occasionally, until collapsed and tender, 7 to 9 minutes. Return potatoes to pot; mash with a potato masher. Add milk and butter, mashing and stirring until mixture is creamy and cabbage is distributed evenly. Season with salt and pepper. Spread mash evenly over lamb mixture; brush top with butter. Place on a rimmed baking sheet lined with parchment.

Bake until golden brown in places and bubbling along edges, 30 to 35 minutes. Let stand 10 minutes before serving. Pie can be refrigerated in an airtight container up to 2 days.

Enjoy!